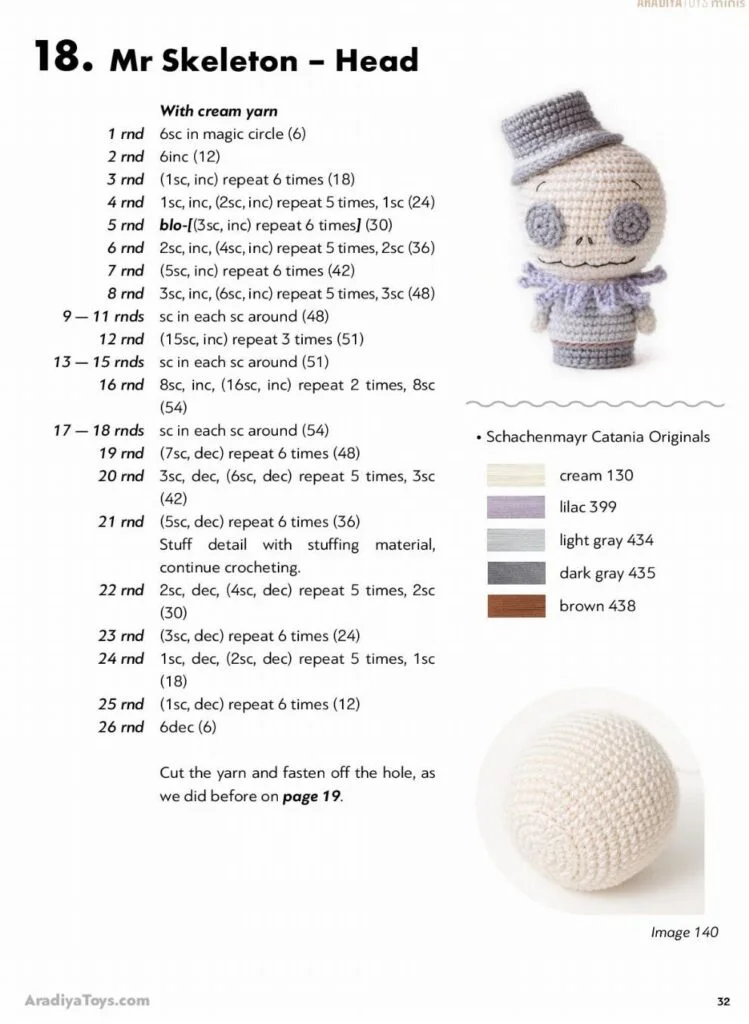
Mr. Skeleton Head in Amigurumi

How to Crochet Stitch and Angel is more than just a crafting topic—it’s a creative journey that combines technique, patience, and artistic expression. Learning how to crochet stitch and angel patterns can open the door to beautiful handmade decorations, heartfelt gifts, and even small business opportunities. Whether you are a beginner picking up a hook for the first time or an experienced crafter looking to refine your skills, mastering this delicate design is both rewarding and inspiring.
Crochet has been cherished for generations because it allows people to transform simple yarn into meaningful creations. When you explore how to crochet stitch and angel, you are not only learning a pattern but also understanding essential stitches, tension control, and shaping techniques. These fundamentals help you create detailed angel figures that can be used as ornaments, keepsakes, or decorative pieces throughout the year.
In this complete guide on how to crochet stitch and angel, you will discover step-by-step insights, essential tools, beginner-friendly explanations, and practical tips for improving your results. The article is carefully structured to help you progress naturally, with clear instructions and optimized information so you can confidently apply what you learn. Let’s begin your crochet journey with confidence and creativity.
Before diving into detailed patterns, it’s important to understand what how to crochet stitch and angel really involves. At its core, this technique combines foundational crochet stitches with shaping methods that form the angel’s body, wings, and halo. Most angel patterns rely on basic stitches such as chain stitch, single crochet, double crochet, and slip stitch.
The first step in learning how to crochet stitch and angel is becoming comfortable with holding the crochet hook and maintaining even yarn tension. Consistent tension ensures that your angel maintains proper shape and structure. Beginners often struggle with uneven stitches, but with practice, this becomes more natural.
Another essential element is choosing the right yarn. Lightweight cotton yarn is commonly recommended for angel patterns because it holds shape well and creates clean, defined stitches. When practicing how to crochet stitch and angel, start with a light-colored yarn so you can clearly see your stitches.
Understanding crochet abbreviations is also crucial. Most patterns use shorthand terms like ch (chain), sc (single crochet), and dc (double crochet). Familiarity with these abbreviations will make learning how to crochet stitch and angel much smoother and more enjoyable.
You should also select an appropriate hook size. The hook size affects the overall texture and tightness of your project. A smaller hook typically creates firmer stitches, which is ideal for decorative angel figures that need structure.
Finally, practice simple circular patterns before attempting a full angel. Many angel bodies begin with a magic ring or a small circular base. Mastering this technique will give you confidence as you continue learning how to crochet stitch and angel patterns in more complex designs.
To begin your angel, start by creating a magic ring. This adjustable loop forms the center of your project. Insert several single crochets into the ring and pull it tight. This becomes the base of your angel’s body.
Next, increase stitches evenly around the circle. Increasing creates expansion, forming the lower part of the angel’s dress. When practicing how to crochet stitch and angel, pay close attention to stitch counts to maintain symmetry.
After building the base, you will begin shaping the body. Switch to double crochet stitches to give the dress a flowing texture. The height of double crochet stitches adds elegance to the angel’s silhouette.
To form the upper body, decrease stitches gradually. Decreasing helps taper the structure, shaping the torso. Careful attention to stitch placement is essential when learning how to crochet stitch and angel to ensure the figure remains balanced.
For the wings, attach yarn at the back of the body. Wings are often created using chain loops and double crochet stitches arranged in fan shapes. This gives the angel a delicate and airy appearance.
Finally, create a small halo by crocheting a short chain and joining it into a circle. Attach it securely to the top of the head. With these steps, you have completed a basic version of how to crochet stitch and angel successfully.
Selecting the right materials significantly improves your results when practicing how to crochet stitch and angel. Cotton yarn is highly recommended due to its durability and stitch definition. Acrylic yarn can also be used, but it may produce a softer structure.
A quality crochet hook is equally important. Aluminum hooks glide smoothly through yarn, while ergonomic hooks reduce hand strain during longer projects. Comfort matters, especially if you plan to create multiple angel designs.
Scissors and a yarn needle are essential finishing tools. The yarn needle helps weave in loose ends neatly, ensuring your angel looks polished and professional. Clean finishing enhances the overall appearance of how to crochet stitch and angel projects.
Stitch markers can be helpful for beginners. They allow you to mark the beginning of each round, preventing confusion and counting mistakes. This is particularly useful when working in continuous rounds.
If you want your angel to stand upright, consider light starch spray or fabric stiffener. Applying a small amount can help maintain shape without compromising texture.
Lastly, store your materials in an organized manner. Keeping yarn untangled and tools accessible will make your experience learning how to crochet stitch and angel more enjoyable and efficient.
Consistency is key when improving your how to crochet stitch and angel technique. Practicing daily, even for short periods, strengthens muscle memory and increases confidence.
Pay close attention to tension control. Uneven tension can cause your angel to look distorted. Relax your grip and allow the hook to glide naturally through each stitch.
Reading patterns carefully before starting helps prevent mistakes. Understanding the entire structure of the project will give you a clearer vision of how the angel forms step by step.
Experiment with different yarn weights. While thin yarn creates delicate angels, slightly thicker yarn can produce larger decorative pieces. Trying variations enhances your understanding of how to crochet stitch and angel versatility.
Blocking your finished piece can dramatically improve its appearance. Gently shaping the angel while damp and allowing it to dry flat ensures crisp lines and balanced wings.
Finally, don’t be discouraged by mistakes. Crochet is a skill that improves with patience. Every attempt at how to crochet stitch and angel brings you closer to mastery.
What does How to Crochet Stitch and Angel mean?
It refers to learning the stitches and techniques necessary to create a crocheted angel figure, including the body, wings, and halo.
Is How to Crochet Stitch and Angel suitable for beginners?
Yes, beginners can learn how to crochet stitch and angel by first mastering basic stitches such as chain, single crochet, and double crochet.
How long does it take to crochet an angel?
A small angel can take between one to three hours, depending on your skill level and pattern complexity.
What type of yarn is best for crocheted angels?
Cotton yarn is often preferred because it holds shape well and provides clean stitch definition.
Can I sell angels I crochet?
Yes, handmade crochet items can typically be sold, especially if you use original patterns or have permission to sell items made from specific designs.
Why does my crocheted angel lose shape?
This often happens due to loose tension or soft yarn. Using a smaller hook or applying light stiffener can help maintain structure.
Do I need special tools to crochet an angel?
No special tools are required beyond basic crochet supplies like yarn, hook, scissors, and a yarn needle.
Can I customize my crocheted angel?
Absolutely. You can add beads, ribbons, or embroidered details to personalize your how to crochet stitch and angel creations.
Learning how to crochet stitch and angel is a fulfilling and creative experience that blends technical skill with artistic expression. Throughout this guide, you explored essential stitches, step-by-step instructions, recommended tools, and practical tips to refine your technique. By mastering tension control, understanding stitch structure, and practicing consistently, you can create elegant angel designs that showcase your craftsmanship.
Crochet is a journey of patience and creativity, and every project helps you grow. Now that you understand how to crochet stitch and angel, it’s time to pick up your hook and start creating. I would love to hear your honest opinion about this guide—did it help you? Do you have suggestions or ideas for future crochet topics? Share your thoughts and continue crafting with confidence and inspiration.
